Tuesday, December 20, 2011

DIY Snowglobe Ornaments

This Christmas the boys and I have had several crafty fun times. One of my favorite times was creating these snowglobe ornaments. They're really easy to make and are really inexpensive. They're made from juice can lids (the frozen from concentrate cans in the freezer section), scrapbook paper, plastic soda bottles, and some crafty embellishments.


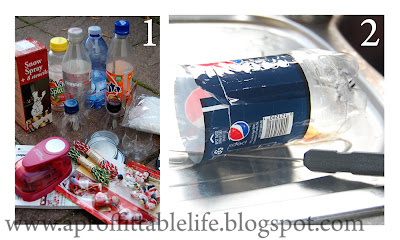
Here's What You'll Need: knife, empty coke plastic bottle, juice can lid, drill, ribbon, glitter and glue or nail polish, scrapbook paper, scissors, 2" circular punch (optional), embellishments for inside your snowglobe (I used mini bottle brush trees and ceramic figurines, plus fake snow).

Here's What You'll Do:


Step 1: Gather the aforementioned supplies.
Step 2: Cut down your empty coke plastic bottles. You'll want to make it as even as possible. I used a serrated kitchen knife and it worked really well. You can recycle the bottom part of the bottle but keep the top along with the cap.


Step 3: With a power drill, drill a small hole into the top of the lid. Go all the way through the plastic and be sure your hole is large enough for your ribbon or string to go through.

Step 4 & 5: Use glue to coat the entire top and sides of the bottle's cap, then use glitter to coat the surface. An easier alternative is to use a bottle of nail polish. I had several that had glittery shimmerly colors, but then I embellished it by adding extra glitter (the nailpolish acts as your glue). It's really easy since the nailpolish already comes with a mini brush!

Step 6: String the ribbon or twine through the hole you drilled in the top of the bottle cap. I added a bit of hot glue to the cap to make sure the string would stay in place. You want this ribbon to be your ornament loop so make sure you have enough of a loop to be able to hang it on your tree.

Step 7: Punch or cut out a circle for each side of your metal juice can lid.

Step 8: Glue the scrapbook or patterned paper circle onto each side of your metal juice can lid.

Step 9: Glue the snowglobe embellishments onto the top of your juice can lid.

Step 10: Using fake snow, glitter, or anything else you'd like, place some into the top of your bottle cap. Then carefully (or else you'll have a mess) turn the bottle top over and place it on top of the juice can lid. Hot glue around the edges, adhering the bottle onto the juice can lid. Try to be neat about it, but you'll be covering the edge in ribbon anyway so make sure you have a good bond.

Step 11: Wrap (while hotgluing) the bottom and/or the top around your bottle cap with some pretty ribbon. Embellish it however you'd like. It really helps to do the bottom with a ribbon edge since it hides any sloppy hotgluing work!

Step 12: Hang it on your tree and enjoy!


Sunday, December 18, 2011

Santa's Belt Gift Jar

Want to create a really cute and inexpensive holiday gift? I made these little beauties for my sons' caregivers at daycare. They're made from empty Starbucks mocha glasses (cleaned and sanitized of course). I washed them in hot water to remove the label and the gunk that adhered it. Then I filled them with holiday chocolates (mini Hershey's bars).

To create the Santa Bottle, you'll need scissors, paper, a printer, a glue stick, clear tape, aluminum foil, thin cardboard (like a cereal box), ribbon, and construction paper (red, white and black).


Step 1: Trim out a strip of red construction paper. You'll want it to be about 2.25" wide by 8.5" long. Wrap this around your empty bottle and adhere with a strip of clear tape at the back (have the back of your bottle be the side where they've printed the use by date).

Step 2: Trim out a piece of white construction paper, approximately .5" wide by 2.25" tall. Using the glue stick, adhere it on top of the red band (vertically oriented).

Step 3: Trim out a strip of black construction paper, .5" wide by 8.5" long. Wrap this around the bottle, adhering it with a glue stick.

Step 4: Cut out a small, square piece of  thin cardboard. I used an empty cereal box that I cut up. My square was about 2 inches square. Cut out a smaller square inside the cardboard square. My smaller square is about .75" square. Then I wrapped the entire thing with aluminum foil, just like a Christmas present. I used a sharp exacto blade to trim out the inside to create that hole in the middle of the buckle.


Step 5: I printed out the "Ho Ho Ho" label that i created in photoshop and glued it onto the top of the lid with a gluestick. You can download the free printable HERE.


After that, I just tied a bit of red ribbon around the neck of the bottle and filled the bottles with the chocolates. Super easy and super cute!

Tuesday, December 13, 2011

Teacher or Caregiver Gifts

So I've been MIA. Suffice it to say that some things got crossed off my to-do list. December is always a hectic month, but I have missed posting. Hopefully now that things have calmed down a bit, I can post more. Yay! At any rate, here's one thing that I've been up to lately:


Caregiver gifts for my boys' counsellors at their daycare. One of his teachers is moving back to the states at the end of this week so I had to get them finished. I think that they turned out pretty cute if I do say so myself. They're made from the drink carrier thing (cardboard) that comes with the starbucks mochas that you can buy in any grocery store. I wrapped the box with some cute wrapping paper that I had on hand, stuffed it full of goodies (more on that later) and wrapped the whole thing in clear cellophane tied with some twine and a gift tag. Drake and Lincoln loved giving them to their teachers and I think the teachers loved receiving them.


Some of the goodies inside the basket include a snowman Hershey's bar, a giftcard, chocolates, and an empty mocha jar filled with popcorn kernels.


I also included a packet of popcorn seasoning. Mmm ranch popcorn...


I turned one of the empty Starbucks mocha bottles into a Santa jar and filled them with Hershey's holiday chocolates. They turned out too cute! Tutorial coming soon.


Another overall view of my fun caregiver baskets. I'm so glad that the teachers enjoyed them. I wanted them to know that I appreciate what they do day in, day out for my kiddoes.

Thursday, December 1, 2011

O Christmas Tree

Want to see what a Christmas tree decorated by one toddler and one preschooler looks like? Of course you do!


That's right. Four ornaments on the same single branch and my "love" ornament backwards to where it looks like it reads, "eval." It was decorated with love by four little hands and it's absolutely perfect.

Tuesday, November 29, 2011

Snowmen Hershey Bars

I'm in the process of creating a gift basket of sorts to give to all of Drake and Lincoln's preschool caregivers (I'll post it later once I have all the parts assembled). Anyway, one part of it is a Hershey's chocolate bar wrapped up like a snowman, which of course I totally stole from was inspired by a pin on pinterest.


Too cute, right? It's not exactly like the pin but I like my take on it. I think it would have looked even cuter if I had some black round brads for the mouth and eye dots, but alas the craft supplies in Germany are sorely lacking.

To create this incredibly simple snowman wrapped Hershey's bar, you'll need sheets of white paper (I used cheap printer paper), a pipe cleaner, clear tape, orange construction paper, glue, a black pen, three scrapbook brads and of course a Hershey's chocolate bar.

What You'll Do:
Cut a sheet of standard US paper into half, while holding it landscape orientation, cut top to bottom. Each sheet of paper will make two snowmen. Place your Hershey's bar on top of the piece of paper to get an idea of where the middle is. Once you have the middle, punch three brads into the paper right in the middle for the buttons. Then draw in two eyes up top and five dots for the mouth. You could conversely use small black round brads, but I had none. Cut a triangle from orange construction paper for the nose, and glue it onto the face. Lastly, wrap a pipecleaner "scarf" around the chocolate bar, meeting up the ends in the front just off-center. Let each end hang down to be the ends of the scarf and trim as necessary. That's it! Very easy and very cute.

Monday, November 28, 2011

Weekend Wanderings - Town Fair

This past weekend our little city had a Christmas market. I love European Christmas markets and since this one was within walking distance, we of course had to go. This year it was about a third the size of the one last year so I'm not sure what was going on, but we still had lots of fun.


This is the far end of the fair, as you're walking along the main road.


The town square with its Christmas tree


A typical booth. There were several food vendors, along with clothing and home decor booths but the selection was much more slim compared to last year unfortunately. I also just randomly snapped photos because I felt like a creeper taking photos of people's merchandise.


A small four man band played holiday classics. They also played some oompah type music that Germany and Bavaria are famous for. No, I'm not sure it's called oompah music, but that's what I'm going with since that's what it sounds like they were playing.


Drake's favorite part of any fair: the rides!


He even got to go twice, this time Link's in the back of the fire engine, crying. He was tired, poor little fella. The weird part about this fire truck is that it's supposedly American (see the words in English) and also the Texas license plate?


Certainly doesn't look like a Texas license plate to me, but you have to give it to the Germans; atleast they tried to make it look Texan with the cowboy.


Yummy and adorable Santa Claus gingerbread cookies.


We also tried to get a decent photo of the family in front of a Christmas tree in the town hall. Unfortunately this is the best that we came up with.  Yeah, it was that bad. One tired toddler, two balloons that kept getting in the way, and a headstrong preschooler does not make a great photo opportunity. And I'm also wearing my son's hat rather than carrying it along since he decided not to wear it. Oh well. Atleast we had a great time, even if we don't have photos of us enjoying it together. Hope you had a wonderful weekend too!

Friday, November 25, 2011

You Capture - Blue

This week's You Capture theme hosted by Beth at I Should Be Folding Laundry is Blue. With two little boys in this house, you'd think I'd have an overkill of blue. But alas, the photo that I settled on has very little blue in it at all. It's mainly orange in fact. But the fact that it's next to the blue and they're complementary colors I think makes it pop more. It's the last hurrah of fall around here. I took this almost a week ago and already the leaves (and the color) are gone. It's starting to look a lot like winter over here.


Gone are the days of the baseball diamond (until next spring of course). Now it's all about football, hot cocoa, and snow sledding. Well, we're still waiting on that first snow but I suspect it'll be any day now.

Hope everyone had a wonderful Thanksgiving. I know I have way too many blessings in my life to give voice to, but I am thankful every day for my life.

Wednesday, November 23, 2011

Happy Birthday Drake!


I can hardly believe that four years ago my oldest son made me a Mommy. I feel so blessed to have him in my life and it's amazing just the depths of love that I have for him. He's been here just four short years, but it seems like I've known him my entire life. He makes me want to be a better person, one that is deserving of such a sweet little boy. On this his fourth birthday, we celebrated.


Can you guess where we went?


Bowling!


Anxiously watching the ball go down the lane (be it ever so slowly).


I'm so disappointed I wasn't on him for this shot. Still really cute of the moment when he knocked all the pins down.


Link's turn!


Eagerly awating the results.


Woohoo! I hit them!


Way too cute. Love this expression on his face after he knocked the pins down.


Today, Drake is FOUR!


Mommy helps Link and Drake bowl.


Cupcakes!


Blow out the candles...


Relight the candles, and this time sing Happy Birthday, and THEN blow out the candles. 


Every present was, "WOW!"


From his Uncle back stateside. He loves building.


Link doing what he loves: shovelling food into his cute face.

We had a wonderful day and I'm so thankful that I got to spend it with my two boys and my sweet husband. Happy birthday, sweet baby Drake!

Monday, November 21, 2011

Easy Oreo Cheesecake Cupcakes

So I found this recipe online, yes at Pinterest again (it's not like I'm addicted or anything...). You can find the original recipe and post here at Handle the Heat. Their photo of the cupcakes looks so much better than mine as well. Here's their photo:


Here's mine:


Okay, so mine isn't nearly as pretty, but trust me, they were tasty. I took some in to my coworkers and I was told that they were pretty bad@$$. And they're incredibly easy to make, the only hard part is that you have to refrigerate them for awhile.

What You'll Need:
42 cream-filled sandwich cookies (read: Oreos), 30 left whole and 12 coarsely chopped
2 pounds cream cheese, softened
1 cup sugar
1 tsp vanilla extract
4 large eggs, room temperature and slightly beaten
1 cup sour cream
Pinch of salt

What You'll Do:
1. Preheat the oven to 275 degrees. Line your muffin tin with regular paper liners (the foil doesn't peel as easily away, learned this one the hard way). Place one whole Oreo cookie in the bottom of each lined cup.

2. Beat cream cheese until it's smooth with an electric mixer. Slowly add sugar and beat until combined. Add in vanilla and beat again.

3. Add eggs one at a time, mixing thoroughly. Beat in sour cream and salt. Then add the chopped cookies in and stir by hand.

4. Divide batter evenly amongst your lined cups, filling almost to the top. Bake, rotating the pan halfway through the cooking time, until the filling is set (about 22 minutes). Transfer to wire racks to cool and refrigerate atleast 4 hours (up to overnight). Remove them from the tins just before serving so they hold their shapes.

Voila. Easy peasy and very delicious!


Monday, November 14, 2011

Santa Free Printable Advent Countdown


Inspired by yet another pin on Pinterest, I've created a free printable. This time it's a Santa Beard Advent Countdown. It prints on two sheets of paper (make sure you set your printer to borderless printing) and I recommend printing on heavy cardstock or heavy resume paper (it'll hold up better than your regular printer paper). Link to free download below.

The poem explains it all:

"Santa's beard is very bare. On his chin there is no hair. So each day add one puff so white, and when they're all on, He'll come that night!"


Every day during the month of December, have your little helper glue with tacky glue (or you can use scotch tape balled over) a cotton puff onto the beard area. Once you get to 25 Santa will be on his way! I'm keeping mine on my fridge this year where my little guy can reach it. I'm going to store the cotton balls in a ziplock baggie next to the fridge as well so he knows how far he has to go until Christmas.

Due to convenience's sake, I've created the printable to print on two standard sheets of US paper (8.5 x 11) since I know most people don't have 8.5x22 paper sitting around. You can turn the sheets over and attach them together with a simple band of clear scotch tape along the seam. The file saves as a pdf file, and you can download adobe reader for free from http://www.adobe.com/.

DOWNLOAD SANTA'S BEARD COUNTDOWN HERE

You can see my original inspiration HERE at Oopsey Daisy..

Linking up at: Tatertots and Jello, One Artsy Mama
Link Party

LinkWithin

Related Posts Plugin for WordPress, Blogger...