Showing posts with label crafts. Show all posts

Thursday, December 6, 2012

Flyswatter Painting

So the boys have been into arts and crafts lately. With the lack of crafts stores in Germany, it's sometimes hard to find things for them to do. I went to the German equivalent of the Dollar Tree (woefully inadequate replacement) and picked up some flyswatters. I'd seen this idea on (where else?!) Pinterest where you put paint daubs on a canvas and gave the kiddos a flyswatter and let them have at it. My boys are a: fans of paint and anything messy, b: really big fans of smacking/hitting things, so I knew they'd have a blast.

 
It turns out, though, that it's really really really messy. I would have tried it outside instead, which is probably a much better idea, but it was raining. Because it's Germany. And it's always raining.

 
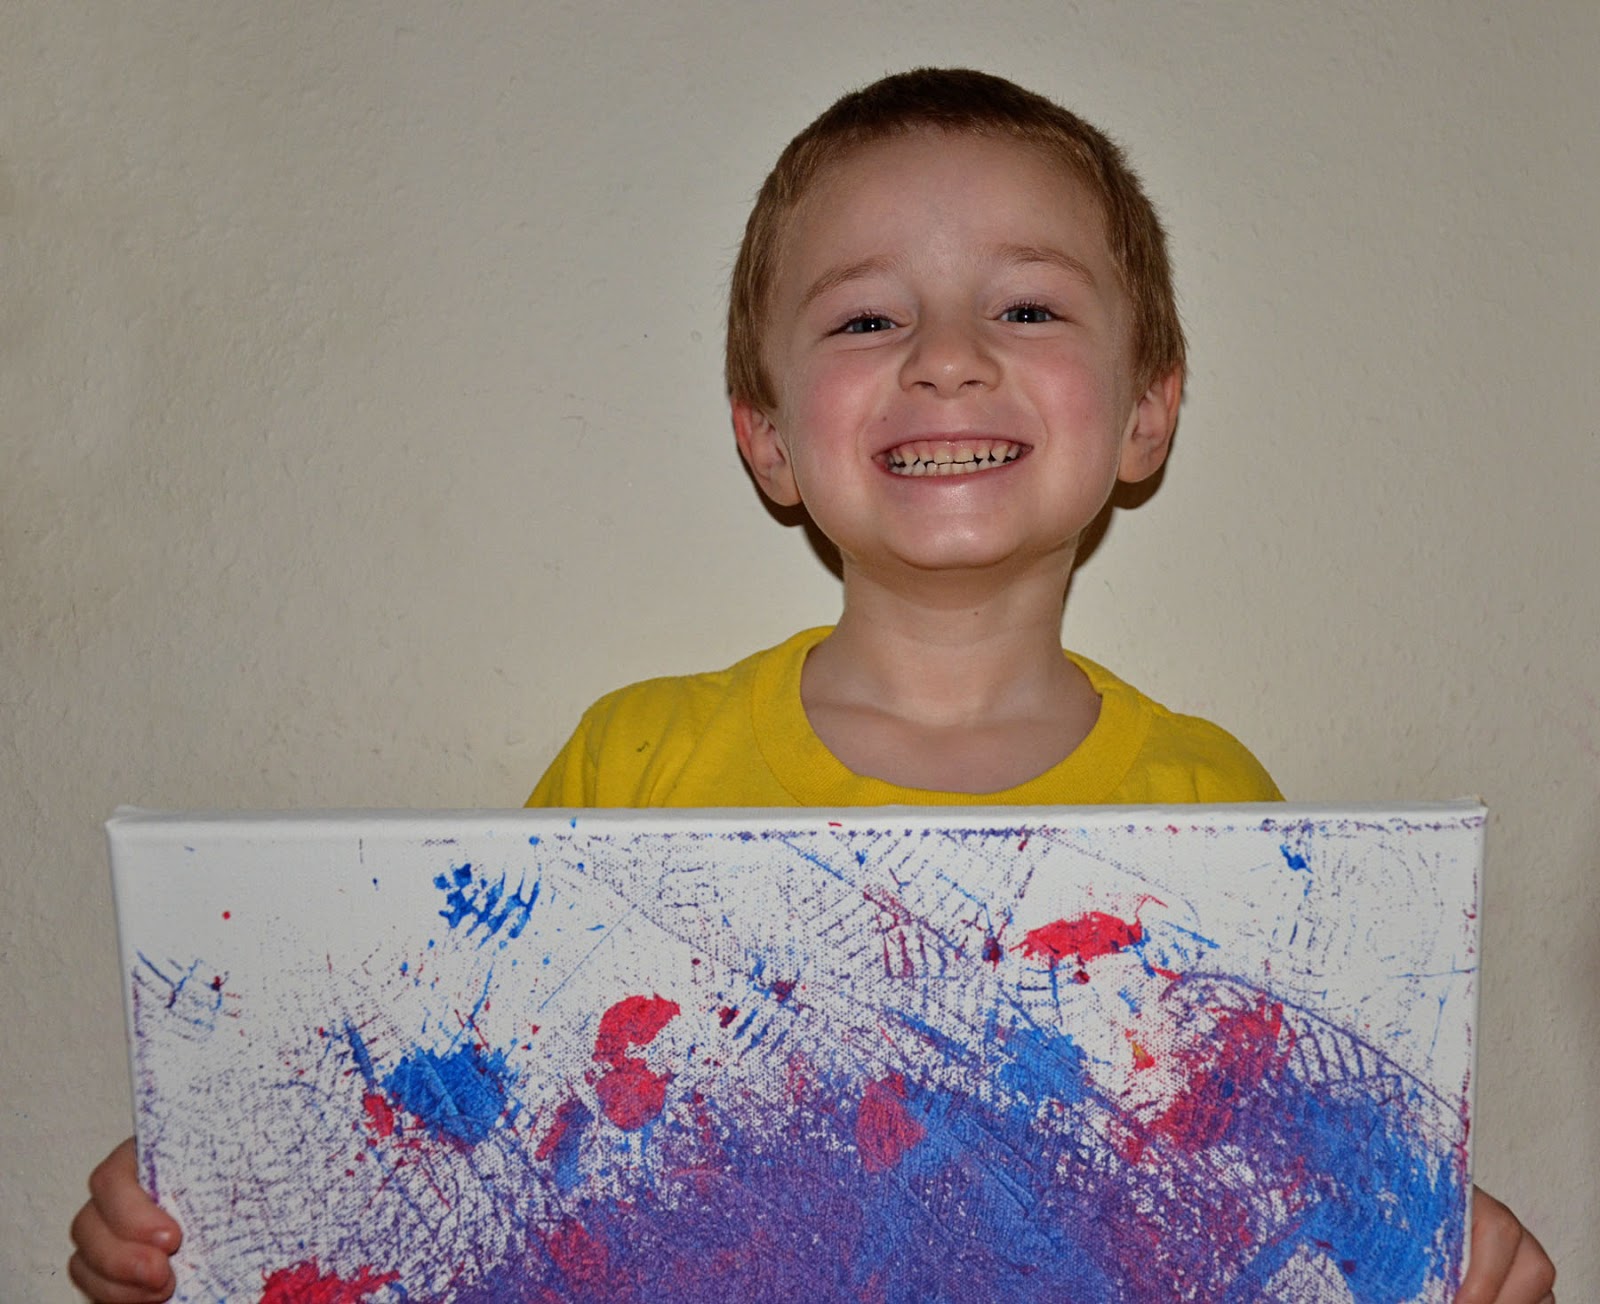
If you look closely you can see the pain on his ear, cheek, eyebrows, hair...

 
It was like instant-gratification art. You get to smack the crap out of the paper and you get beautiful results. Link was a huge fan.

 
I was not a huge fan of the mess. We obviously got a little wild with our smacks, and by we, I mean them. But the fun was worth it. Nothing a little magic eraser can't help!

 
Here's our final results:
 
 
Link used a three color approach, while Drake wanted just red and blue.

 
I sealed the canvases with some glossy fixative and they now hang proudly in my foyer. Beautiful artwork with sentimental meaning at the price of fun. Win-win-win!
 

Tuesday, November 20, 2012

Potato Stamp

So I know this isn't a new idea by any stretch of the imagination, but we had a lot of fun with it. We created stamps from potatoes (I had red fingerling potatoes in the house as I am obsessed with roasted potatoes).


What we did: Mommy carved a heart into a few potatoes, then poured some different colored paint into plastic-coated disposable plates (I suppose you could be fancy and use palettes if you have them!), then let the boys go to town.


Perfect indoor craft for little hands, especially if you have a toddler (like me) who lacks fine motor skills. We ended up with quite a few lovely sheets of hearts, so we wrote a short message to Daddy and tucked it into his deployment bag.


Yay! I'm thinking these would also look great this time of year with leaves carved into the potatoes or snowflakes.

Tuesday, December 20, 2011

DIY Snowglobe Ornaments

This Christmas the boys and I have had several crafty fun times. One of my favorite times was creating these snowglobe ornaments. They're really easy to make and are really inexpensive. They're made from juice can lids (the frozen from concentrate cans in the freezer section), scrapbook paper, plastic soda bottles, and some crafty embellishments.


Here's What You'll Need: knife, empty coke plastic bottle, juice can lid, drill, ribbon, glitter and glue or nail polish, scrapbook paper, scissors, 2" circular punch (optional), embellishments for inside your snowglobe (I used mini bottle brush trees and ceramic figurines, plus fake snow).

Here's What You'll Do:


Step 1: Gather the aforementioned supplies.
Step 2: Cut down your empty coke plastic bottles. You'll want to make it as even as possible. I used a serrated kitchen knife and it worked really well. You can recycle the bottom part of the bottle but keep the top along with the cap.


Step 3: With a power drill, drill a small hole into the top of the lid. Go all the way through the plastic and be sure your hole is large enough for your ribbon or string to go through.

Step 4 & 5: Use glue to coat the entire top and sides of the bottle's cap, then use glitter to coat the surface. An easier alternative is to use a bottle of nail polish. I had several that had glittery shimmerly colors, but then I embellished it by adding extra glitter (the nailpolish acts as your glue). It's really easy since the nailpolish already comes with a mini brush!

Step 6: String the ribbon or twine through the hole you drilled in the top of the bottle cap. I added a bit of hot glue to the cap to make sure the string would stay in place. You want this ribbon to be your ornament loop so make sure you have enough of a loop to be able to hang it on your tree.

Step 7: Punch or cut out a circle for each side of your metal juice can lid.

Step 8: Glue the scrapbook or patterned paper circle onto each side of your metal juice can lid.

Step 9: Glue the snowglobe embellishments onto the top of your juice can lid.

Step 10: Using fake snow, glitter, or anything else you'd like, place some into the top of your bottle cap. Then carefully (or else you'll have a mess) turn the bottle top over and place it on top of the juice can lid. Hot glue around the edges, adhering the bottle onto the juice can lid. Try to be neat about it, but you'll be covering the edge in ribbon anyway so make sure you have a good bond.

Step 11: Wrap (while hotgluing) the bottom and/or the top around your bottle cap with some pretty ribbon. Embellish it however you'd like. It really helps to do the bottom with a ribbon edge since it hides any sloppy hotgluing work!

Step 12: Hang it on your tree and enjoy!


Sunday, December 18, 2011

Santa's Belt Gift Jar

Want to create a really cute and inexpensive holiday gift? I made these little beauties for my sons' caregivers at daycare. They're made from empty Starbucks mocha glasses (cleaned and sanitized of course). I washed them in hot water to remove the label and the gunk that adhered it. Then I filled them with holiday chocolates (mini Hershey's bars).

To create the Santa Bottle, you'll need scissors, paper, a printer, a glue stick, clear tape, aluminum foil, thin cardboard (like a cereal box), ribbon, and construction paper (red, white and black).


Step 1: Trim out a strip of red construction paper. You'll want it to be about 2.25" wide by 8.5" long. Wrap this around your empty bottle and adhere with a strip of clear tape at the back (have the back of your bottle be the side where they've printed the use by date).

Step 2: Trim out a piece of white construction paper, approximately .5" wide by 2.25" tall. Using the glue stick, adhere it on top of the red band (vertically oriented).

Step 3: Trim out a strip of black construction paper, .5" wide by 8.5" long. Wrap this around the bottle, adhering it with a glue stick.

Step 4: Cut out a small, square piece of  thin cardboard. I used an empty cereal box that I cut up. My square was about 2 inches square. Cut out a smaller square inside the cardboard square. My smaller square is about .75" square. Then I wrapped the entire thing with aluminum foil, just like a Christmas present. I used a sharp exacto blade to trim out the inside to create that hole in the middle of the buckle.


Step 5: I printed out the "Ho Ho Ho" label that i created in photoshop and glued it onto the top of the lid with a gluestick. You can download the free printable HERE.


After that, I just tied a bit of red ribbon around the neck of the bottle and filled the bottles with the chocolates. Super easy and super cute!

Friday, October 14, 2011

Road Monogram for the Playroom

Inspiration from Pinterest strikes again! I found myself this morning with about 3 hours of spare time. My options to fill that time were: a) nap, b) be crafty, or c) clean the house. Option A was awfully tempting but alas today for some reason I'm wide awake. So I opted for Option B since it sounds like so much more fun than Option C. I re-created this fun road monogram that I found on pinterest:


My monograms aren't as exact as the original pin, but I wanted them to be more child-like. I used black construction paper, cut out the letters I needed (D for Drake, L for Lincoln and then P for Proffitt), glued them onto a white piece of paper, then with chalk added my lanes. I used hot-glue to glue my cars onto my streets. I also made these smaller (the D and L are 8x10 size) so I used the party supply cars (you know, the ones that come as favors). They were also cheaper than purchasing hot wheels. Voila! Super cute artwork for the playroom on the dime.

Tuesday, September 13, 2011

Fall Wreath

You know all those cute photos that are blowing up blogs and pinterest of adorable yarn wreaths? Yeah, I just had to get in on the action. I actually created my yarn wreath about 4 months ago but just now got around to creating the flower embellishments. It's a really simple thing to create so I definitely recommend doing it if you're in a crafty mood and want a cute wreath. Here's my final creation:


I used a couple of different types of felt flowers. The four petal ones are from the Martha Stewart tutorial which can be found here: Martha Stewart. The large rosette in the middle I did following a friend's tutorial, which you can find here: A Bird and a Bean. Both were super easy.

Here's my quick tutorial for creating your own wreath:

1. Buy a skein or two of yarn (depending on how big your wreath is going to be). Purchase a wreath form while you're at it. And if you can find some fabric or felt to create the flower embellishments while you're at it, you're good to go.

2. Start wrapping your wreath form with your yarn. This will take loads of time and is the hardest part of this project because it requires loads of patience. I wrapped mine twice so that the white form didn't show through. I secured the end by a dot of hot glue.


3. Create your flowers. As many or as few as you want. Follow the tutorials on the websites linked above as those two wonderful women will explain things much much better than I ever will.

4. That's it. Enjoy!

Here's my wreath as part of my motley wall composition:


If you create a fall wreath (or any wreath for that matter) I'd love to see it! Send me a link in the comments. I'm always looking for new crafty ideas to steal inspiration.

Tuesday, August 16, 2011

DIY pretty patterned binder clips

Drake's starting preschool soon. It makes me incredibly happy and sad all at the same time. I don't know how he got so old so quickly. As part of a teacher gift, I created some pretty patterned binder clips for his teacher. They're really easy to make, but they're such a cute little accessory. Here's the final version:

I used an old map that I printed out from an image online. To make it "antique" I aged it a bit, which I'll explain later. You can use any scrapbook paper that you happen to have on hand of course.

Here's what you'll need:
Binder clips (as many as you'd like)
Scrapbook paper or printed images
Glue, I used quick set crazy glue
Sealer, I used Martha Stewart's decoupage glue and sealer
Tea bag or two

Here's what you'll do:
Step 1: Print out the images you'd like to use. Keep in mind that these binder clips are very small. The largest one that I had was 1.25" by .625" on each face. You'll need a strip about 1.25" wide by 1.75" tall to fit one of the largest binder clips. If you already have pre-printed scrapbook paper printed, you might just want to trim it down to size. You can hold the paper up next to the clip to get a good idea about the size that you'll need.


Step 2: Trim down the paper to fit your binder clip, making sure that the paper wraps all the way around the clip. Make sure that if you have any text that it's right side up (not upside down) when measuring it. Once you have the correct size, glue the piece of paper to the clip. Press firmly on the paper for a bit after adhering it to ensure a good seal. I suggest starting at the main face and working your way across the top and back down the backside when adhering the paper to the clip.


Step 3: Skip this step if you're just using standard old scrapbook paper and you don't want that aged look. But if you want to age your clips to give them an antique look, follow this step.


To age your clips, brew a cup of tea. Don't throw away the bag of tea, though. You'll want to squeeze out the excess water (leaving very little inside the bag) and rub the bag over your designs. Pass over the designs as many times as necessary (allowing them to dry between passes) to age the paper as much or as little as you'd like.


Step 4: Once you're happy with the "antiqueness" of your design, seal the entire clip with a couple coats of your sealer (again, I used Martha Stewart's Decoupage Glue and Sealer).


Let dry, put them in a cute drawstring pouch along with some other cute teacher essentials and you've got yourself one cute teacher gift.

Monday, June 27, 2011

Giveaway Hand Stamped Magnets Reminder

Just a reminder that my giveaway for my hand-stamped magnets (your choice of four, with any wording hand-stamped onto them) is still available. You can see the original post HERE. Please don't leave any entries here as they won't be counted. Please comment on the original post in order to qualify.


DSC_0014 (2)

Wednesday, June 22, 2011

Giveaway: Handstamped Magnets

So awhile back I posted my tutorial on hand-stamped fridge magnets. I hinted at a possible giveaway, so now I'm making good on that hint. Here's your chance to win your choice of four hand-stamped fridge magnets. You'll get to tell me what you want on each of your designs. Sounds great, right?

DSC_0014 (2)

Here's the ways to win:
{This entry is required. Please leave a valid email address on each entry so that I can contact the winner!}

Become a follower of my blog. Somewhere in the right column there's a button to follow. Leave me a comment letting me know that you're following me now. If you're already a follower, leave a comment letting me know that as well.

Extra entries:
#2. Like my facebook page. Leave a comment letting me know that you've done so.

#3. Check out my etsy store. Come back here and let me know what your favorite design is.

#4. Check out my etsy store. Come back here and let me know what design or theme you'd LIKE to see. It has to be something I don't already have for sale. For example: lizards or Alice in Wonderland.

This giveaway is open to all US and Canada citizens as well as those with APO/AE/FPO addresses. The contest will end on Wednesday, June 29th. Winner will be drawn at random. Good luck!

linked up to: Someday Crafts, Katie's Nesting Spot, Paisley Passions, It's a Hodge Podge Life, My Repurposed Life, Fingerprints on the Fridge, Tatertots and Jello, Lolly Jane Boutique, I Heart Naptime, Petite Hermine, Sumo's Sweet Stuff, Making the World Cuter

Monday, June 20, 2011

Summer Cupcakes

For father's day yesterday I baked some cupcakes. I think they turned out pretty cute, and I definitely had way too much decorating them. That part was definitely more fun than the baking and cleanup part.


Cute, aren't they? I made two types of cupcakes. One design features gummy bears floating on green floaties amid a sea of blue and the other design is gummy bears sunbathing on the beach under an umbrella.


They were almost too cute to eat. Almost, but not quite. The boys were unimpressed with my decorating skills and just wanted to lick the icing off the cupcakes. Oh well. Atleast I know they enjoyed the taste.


Since I'm no baking whiz nor do I have extra time to spend baking from scratch, I used a simple box cake kit and vanilla icing. I made the cupcakes following the directions on the box, and then let them cool. Once they were completely cool, I halved the icing into two separate bowls. One bowl I tinted blue (for the water), and the other yellow (for my sandy beach). I iced the cupcakes and then decorated.

You'll need fruit by the foot or the fruit roll-ups for the beach blankets (cut them to size using kitchen shears), gummy bears, and gummy rings. To make the beach umbrellas, I used toothpicks, my 2" circular punch, and scrapbook paper that I had on hand. I punched the circles out, then cut out a pie-shaped piece from each circle (about 1/8 of the total circle), then roll the paper into a cone shape, and secure it with clear tape. I then stuck the toothpick into the middle of my umbrella. Voila. Perfectly sized beach umbrellas for gummy bears.

This photo looks like they're all on different sized waves..love it!

Sunday, June 12, 2011

Simple Vase


When we got our orders to Germany I was forced to confront all the junk  stuff we had accumulated over the years before the move. To say there was a lot is an understatement. I made four trips to the local Goodwill to donate a lot of stuff, and there were several overfilled trash bins on our curb a couple of weeks too. I didn't want to just move stuff from point A to point B and especially not stuff that I wasn't using or even needed. This apparently included all my vases.

My husband's a great guy and gets me flowers pretty regularly but it's disappointing to have some really gorgeous flowers stuck in a water glass. It's like wearing a glamourous ball gown with flip-flops. To solve my dilemma, I created a really simple and elegant vase.


The best part is it's free to make and incredibly simple. I used a leftover Starbucks iced frappuccino bottle (I'm addicted, don't judge!). Then I added a couple light layers of spray paint (which I already had in the house), added water and flowers, and voila! Instant upgrade from using a standard water glass as a vase. I think it'd be really cute if you spray painted it in horizontal stripes, probably divided it into uneven thirds and did varying shades of say blue. I only have two colors of spray paint on hand though (white and silver). Let me know if you try this at home. I'd love to see your project!

Friday, June 3, 2011

Fridge Magnets DIY


I love what little time I get to myself to be crafty and creative. I love the look of hand-stamped jewelry (if you don't know what it is, just do a simple search on etsy) and I even gave out hand-stamped keychains before for Christmas gifts. I've been looking for other uses for my metal stamping kit (available in most hardstore stores, and even online) and I've found it!

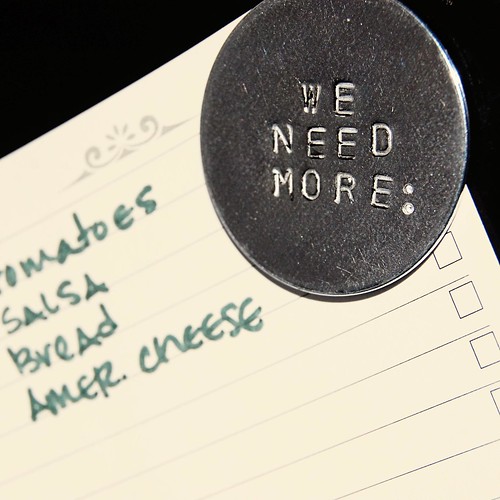
I created these cute fridge magnets. I love the clean look of them (no more mis-matched and cluttery magnets) and the handmade look (they're by no means perfect since I stamped them myself).  To make your own you will need a set of alphabet metal stamps, a hard surface, a hammer, metal discs or washers, glue (I used LocTite superglue), and magnets.

First, find a clean, childfree workspace. I say this because when I got up from my workspace to answer the phone, I came back to find that my son had punched in extra letters on my finished designs! It's really important to have a hard surface to stamp against. This helps the stamp really penetrate your metal washer.


I recommend having an extra disc or two to try out the force with which you'll need to strike each alphabet. It also helps ensure that you have your letters lined up properly before you do it on your washer. You ideally want to hit the end of the alphabet stamp with a firm hand, just once. If you don't think you hit it hard enough, go ahead and do it again, but do not move the stamp. It's really hard to line it up again perfectly, in my experience, if you've moved it. I found that holding the hammer mid-way down the shaft also gives you greater control over the hammer. If you get comfortable with it, I'd suggest moving onto your real piece, but only after lining out your letters and figuring out your spacing. Sometimes it helps to start with the center of a word and work left and right from there, rather than going left to right.


After you're happy with the design, it might be a little uneven (ie: no longer flat). I find that if you give it some gentle taps it'll even out. I always do this on the backside of the design. Then since it's already flipped over, dab a little super glue onto your magnet (make sure you do it on the non-magnetized side) and then stick it to the back of your finished design. Once your design is dry, you can take a permanent pen with a really small tip and "color in" your letters to make them stand out more. Here's another one of my designs that I did today (they aren't photographing well):


There might be a giveaway in the future regarding some personalized fridge magnets since I have some leftover materials...stay tuned!

Linking up at: I Heart Naptime, Under the Table and Dreaming, The DIY Showoff, Between Naps on the Porch

The DIY Show Off

Sunday, May 29, 2011

Anniversary Project

So it's my eight year anniversary coming up soon. It's amazing to think that we've been married for that long. It certainly doesn't feel that long. Here's a photo of us on our wedding day:


The crazy thing is we're sitting on the same bench in the church courtyard where we took our prom photos together. I'd post that photo, but it's somewhere in storage.

This year we decided that we aren't going to buy each other anything for our anniversary. Money's tight because we're saving for our vacation this summer (Venice and Rome!). We are counting our vacation as our anniversary gift to ourselves. I hate not giving him something other than a card though, so I crafted him something I knew he'd love and really use: a treat jar!


It's a recycled peaches pull-top can, some paper and tape, and treats we had around the house (m&ms) leftover from Link's party. Therefore, cost for this project: $0. I wish I could say I came up with this idea, but I didn't. You can check out the complete tutorial from Our Best Bites. This idea would make a great gift for teacher appreciations, graduations, birthdays, anything really.

Have a great Memorial Day!

Monday, May 9, 2011

What I'm Up to Today...

So a certain little guy has a birthday coming up...really soon. Friday, in fact. I've been busy today creating some things for his party. I've put it off until the last moment because I've had all these wonderful fun things in my head that I wanted to create/bake/do for him, but I just couldn't choose. Now that it's crunchtime, I don't have the luxury of deliberating any longer. It's go time! Here's some of the things I'm working on today:


After the party, I'll post some proper photos and not just a teaser. Happy Monday everyone!

LinkWithin

Related Posts Plugin for WordPress, Blogger...